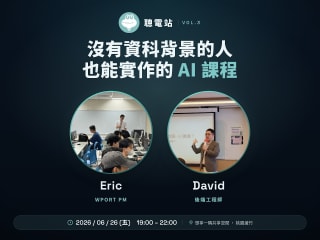
Learn AI Without a CS Background: Full Hands-On Guide to GitHub Fork, Cursor IDE, Obsidian, CLI, and MCP
You do not need coding experience to build a personal site, tailored resumes, and automated workflows with AI tools. This article fully reconstructs Congdianzhan Vol.3's four practice stages, from AI IDE to Vercel deploy, step by step.

Have you ever felt this: you see someone make something cool with AI, you want to try too, but the moment you open the tool you have no idea where to start?
This article is the full written version of Congdianzhan Vol.3. The course design starts from a simple idea: even if you have never written code, after three hours you can go home with real results.
We are reconstructing all four practice stages here so people who could not attend can still follow along.
Stage A: Fork the GitHub Project and Set Up Your AI IDE Environment
The goal of this stage is simple: get every learner’s computer onto the exact same project as the instructor, and start working in the same environment. It looks like a warm-up, but if this step is shaky, everything after it will drift.
1. Fork the Course Repo on GitHub: Own Your Own AI Project Copy
At the start of class, we asked every learner to log into GitHub, open the course materials repo, and click Fork in the top right to copy the full project under their own account.
Why Fork instead of downloading a zip?
- A forked project is “another copy under your name.” You can edit, save, and push freely without touching the instructor’s original.
- Later, when you deploy a personal site, Fork is also the smoothest starting point, because platforms like Vercel and Cloudflare Pages can bind directly to your GitHub account.
- More importantly, Forking makes learners realize for the first time that “code has versions and owners,” not just a random download package.
Looking back after the course: if the only goal is a fast start, you do not necessarily need to teach Fork first. Downloading the repo also works, and it avoids getting stuck on GitHub signup or understanding what Fork means.
Course repo: wport-ai-starter-kit. CLI, MCP, Skills, and README are already set up. Once learners Fork it, they have a clean environment ready to use.
2. AI IDE vs Chatbot: Why Work Needs to Leave the ChatGPT Chat Box
Most people’s first contact with AI is a chatbot like ChatGPT. So we spent time making the difference between a chatbot and an AI IDE (integrated development environment) crystal clear. This was the most important mindset shift of the whole course.
A very everyday analogy:
- A chatbot chat box is like calling customer support. You ask one thing, get one answer, then it is over. You still have to organize notes, copy into Word, paste into email, and save to the cloud. The whole flow is “you moving answers around.”
- An AI IDE is like inviting AI into your home studio as a coworker. It can see the files on your desk, edit them directly, and run programs on your computer. Everything stays inside your project. You stop endless copy-paste. AI becomes someone who “gets things done with you.”
For beginners, the differences that land hardest are:
- Results actually stay on your machine: the personal site, Obsidian notes, and resume HTML you make today live in your own folders, not trapped in a chat window that disappears when you close it.
- No more pasting context over and over: an AI IDE can read the file you just edited. You do not need to paste code, resume, and notes every time.
- It can actually run programs: ask AI to write a page, and it does not just give you text. It can open it on your computer and even help you deploy it online.
Once everyone understands that “work has to move from the chat box into an AI IDE,” Fork, README, Skills, and CLI stop being random jargon and start making sense.
3. Four Free AI IDEs in 2026: Cursor, Codex, Kiro, Antigravity
That day we covered four mainstream AI IDEs with free quotas in 2026. First, the question we hear most in the room: why no Claude? Not because Claude is bad. It currently has no free quota, and this course assumes beginners can start hands-on immediately. So we limited the list to options with free quota that you can begin right away.
Before the differences between vendors, one beginner-critical idea: these four IDEs look almost identical. Under the hood they all branch from VS Code, the world’s most popular editor. Think of them as “four AI sons of VS Code.” Learn one, and you can switch to another without relearning the interface.
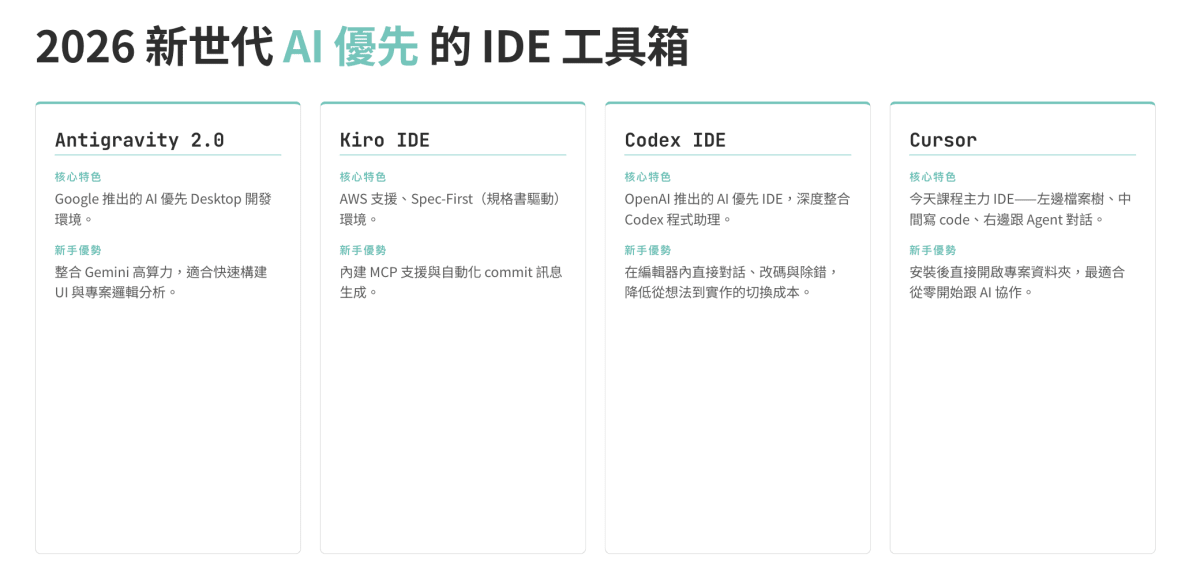
How the four free AI IDEs are positioned:
Cursor
Eric’s personal daily driver, and the one we most recommend beginners start with. The reason is “generous quota.” Claude-family tools often hit rate limits once you start coding, but for PMs, content workers, and non-CS users, Cursor’s roughly NT$600/month allowance is usually more than enough.
Kiro IDE
AWS’s AI IDE. It emphasizes Spec-First development: write the spec clearly first, then let AI generate code against it. Especially good for PMs, SAs, and systems thinkers who like process and prefer thinking before building.
Codex IDE
OpenAI’s AI coding assistant environment. If you already work in ChatGPT’s rhythm, Codex IDE feels like “upgrading from a chat box into a workbench.”
Antigravity 2.0
Google family’s AI IDE. If you already live in Gmail, Google Drive, Google Docs, and Google Meet, the Google ecosystem integration feels very smooth.
We do not hard-sell any one product. The point is: you do not need to spend money first, and you do not need to chase brands. Pick one that is free and does not block you, then start building. Because the interface is all VS Code family, switching later is painless.
Stage B: Use an AI IDE to Quickly Understand an Unfamiliar Repo
Opening a project is another barrier for beginners. A screen full of folders and files you cannot read makes many people want to close everything. This stage’s goal is to help learners use an AI IDE to understand what an unfamiliar repo does in about 5 minutes, and lower that mental wall.
4. Drag README into Chat: Understand a Strange Repo with AI in 3 Minutes
After learners open the forked project in the IDE, we ask them to do two things:
- Find
README.mdin the file list. - Drag it into the chat panel on the right, then ask AI: “What does this repo do? Can you explain it in a bullet list in English?”
Two teaching intentions sit behind this move:
- Teach “feeding context”: beginners often ask AI with no context, then blame it for vague answers. Dragging the README in first is like handing over a project brief. Answers get sharper immediately.
- Build the professional habit of “read the README first”: that is every engineer’s first move on a new project. You do not need to understand the code yet, but you do need to know what the project is for, which modules exist, and how to run it.

The most memorable moment in the room: many learners thought it would take an hour to understand the repo. Three minutes later, AI had listed the goal, structure, and available Skills. That instant changes how they face any unfamiliar project afterward.
Stage C: Obsidian Knowledge Map × Skill Interview Mode: Turn “You” into AI-Readable Data
This stage took the most time and created the most value. What we were doing was simple: turn “you as a person” into structured data AI can read. Only then can AI make something that truly belongs to you, instead of a template resume or template website.
5. Obsidian Personal Knowledge Map: Turn “About Me” into an AI-Readable Second Brain
The goal that day was for each person to ship a personal site. So before talking about how the site looks, we talked about where the content comes from.
We chose Obsidian as the personal knowledge management (PKM) tool for three reasons:
- Local privacy, fully local storage: Obsidian notes live on your own computer, not in the cloud. AI only needs a local path to read them. That feels much safer for people who do not want resumes, experience, or salary expectations sent to cloud AI.
- Bidirectional links × knowledge graph: Obsidian supports backlinks. Experiences, skills, and projects can connect to each other and gradually form an “about me” knowledge graph.
- Pure Markdown, easiest for AI to read: Obsidian uses clean Markdown. AI is especially good at this structure, easier to parse than Word, Notion, or Google Docs, and usually cheaper in tokens.
In class we asked learners to create a few core nodes first: experience, skills, projects, and the career direction they want. Each node can split into finer pages. The point is not perfection. Dump the raw material first.
6. Skill Interview Method: Let AI Help You Think, Not Just Write
Many people get stuck here: “I do not know what to write.” That is completely normal. Explaining yourself from zero is hard.
So we flipped the approach. The repo includes a prebuilt Skill whose job is not “write for you,” but “interview you”:
- What are your three most fulfilling work experiences? What problem did you solve then?
- If you could introduce yourself with only three keywords, which three would you pick?
- What kind of daily rhythm do you want in your next role?
Learners only need to answer the questions AI asks. Those answers become new notes and fill Obsidian one by one. Thirty minutes later, a blank knowledge map has grown naturally.
The real lesson here is a mindset: AI’s strongest use is not “write for you,” but “help you think.”
7. Local Path × Skill Generates HTML: AI Reads Local Files and Builds a Personal Site in One Go
Once the knowledge map has a skeleton, we move into “turn it into a site.” Our flow:
- Open Obsidian and copy the vault folder’s local path (for example
/Users/your-name/Documents/my-obsidian-vault). - Back in the AI IDE, call another Skill in the repo and paste the local path.
- The Skill automatically reads all Obsidian notes and, following a predefined site structure, generates a complete personal-site HTML.
Why use a local path instead of pasting notes into chat?
- Break context-length limits: a full knowledge map can mean dozens of Markdown files. Pasting them easily blows past token limits, and AI only reads the front half before running out of room.
- AI can choose what to read: with a local path, AI follows Skill instructions and reads the right files, for example “experience” for a resume and “projects” for a site. Smarter than manual pasting.
- Preserve file structure and bidirectional links: copy-paste flattens Obsidian backlinks and folders into plain text. Reading via local path lets AI understand your original knowledge relationships, so the output stays closer to your logic.
Simply put: pasting dumps data into a black hole; a local path lets AI walk into your filing room and look around. Output quality is completely different.
Stage D: Prompt → Skill → CLI × MCP: Build Rerunnable AI Workflows
By this point, learners already have a personal site. If we stopped there, the course would just be a flashy afternoon workshop. What we want people to take home is an AI workflow they can rerun themselves every month.
8. From Prompt to Skill: Turn Effective Prompts into Reusable AI Capabilities
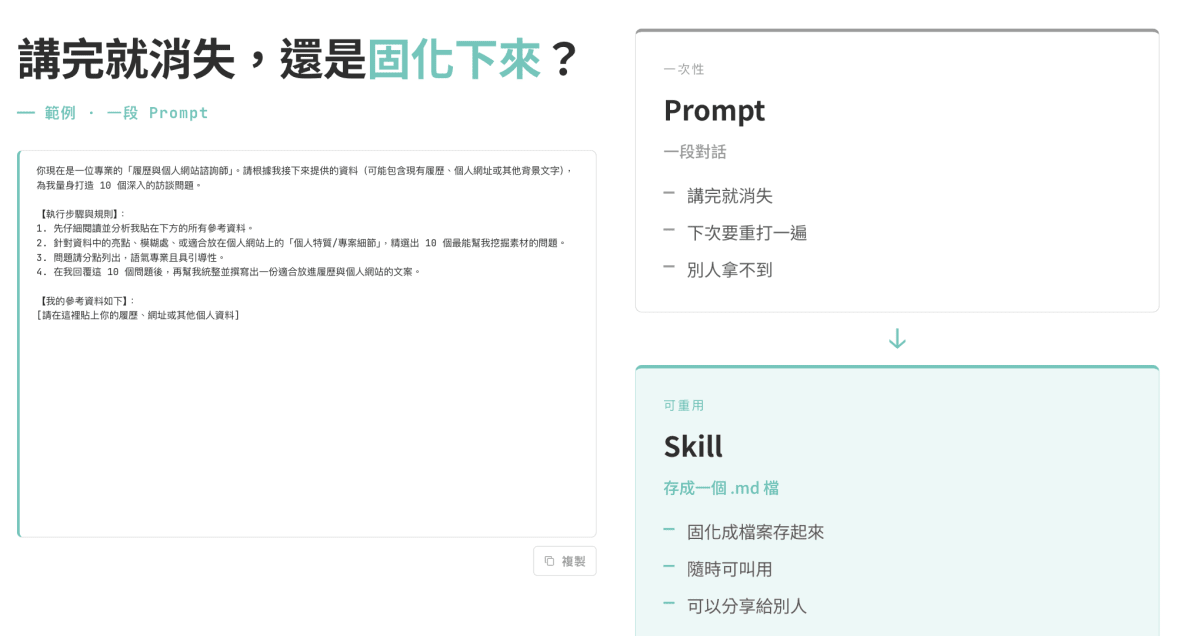
- A Prompt is the sentence you type in the moment, like “help me write a PM resume.” Use it once and it is gone. Next time you have to reinvent the ask, and quality is often unstable.
- A Skill packages a repeatedly validated set of prompts, steps, and output formats into a “reusable capability.” It has a name, a version, can be invoked, and can be reused across projects.
Another analogy: a Prompt is improvised Q&A on the spot. A Skill is writing down the SOP of your best interviewer so anyone can follow it later. For beginners, that means you do not need to become a prompt master. Solidify a few prompts that actually work into Skills, then use them for the long term.
9. CLI vs GUI: In the AI Era, Skip the Mouse and Use the Command Line
Many learners freeze when they hear “command line,” but our explanation is plain: CLI means you type one command and the computer does one job. It is not that different from clicking a button on a webpage. You just swap mouse clicks for keyboard input.
When your only tools are GUIs (graphical interfaces) and you want AI to operate them for you, you hit two big pitfalls:
- GUIs burn tokens fast: for AI to use a GUI, it has to “see” the screen, screenshot it, parse UI elements, and decide where buttons are. Token use can be many times to dozens of times higher than a pure CLI call.
- One mouse miss and it clicks the wrong thing: if the page style changes once, a button moves a few pixels, or an ad popup appears, AI clicks the wrong control and the whole flow collapses.
So in 2026, “does it have a CLI?” is becoming a major signal for whether a tool is AI-friendly. GUIs are for humans to look at. CLIs are for humans and AI to use together.
We demoed live with WPORT CLI: type one command, set “region = Taoyuan, role = PM,” and seconds later a matching job list appears as structured data (JSON), ready to feed the next Skill.
10. Resume Customization Skill: 3 Jobs, 3 Tailored Resumes at Once
With job data in hand, the next step is resume customization:
- Use the knowledge map from Stage C as raw resume material.
- Call the resume customization Skill in the repo and feed it the 3 PM jobs just pulled via CLI.
- For each job, the Skill compares the job description, reorders your experience, swaps keywords, and generates a dedicated PDF or HTML resume.
The result: in the time it takes to finish a coffee, you get three completely different resumes, each aligned to the other side’s needs. That is also why we encourage customized resumes, yet most people never do it: it is exhausting. When a Skill turns it into one click, behavior actually changes.
11. Vercel CLI: Ship Your Personal Site with One Command
By now, learners have personal-site HTML, three tailored resumes, and a job list. Next is sending it out:
- Vercel CLI: one command deploys the local site online and gives you a shareable URL. What used to require signup, GitHub binding, and project setup is now just typing.
- gcloud CLI: Google Cloud’s command-line tool. From the CLI, send an email with the resume URL and personal-site link to a target company or referrer.
Together, these two CLIs complete a full “publish + outreach” flow. You are no longer only passively submitting resumes. You have an automated pipeline from content to notification.
12. CLI × MCP × Skill: Building-Block Thinking for AI-Era Workflows
Finally, one idea to close. This course looks like a tour of IDEs, Obsidian, CLI, Skills, and more tools. The real point is this sentence:
CLI x MCP x Skill are building blocks you can combine. The workflows you can assemble go far beyond what you imagine.
Common combinations:
- Job-search stack: CLI pulls jobs → Skill customizes resumes → CLI deploys the site → CLI sends outreach email
- Content stack: MCP reads Notion notes → Skill turns them into an article outline → CLI publishes to the blog
- Personal CRM stack: CLI pulls LinkedIn lists → Skill analyzes conversation history → MCP updates the contact database
The point is not these exact examples. It is understanding that once you treat CLI, MCP, and Skill as blocks, you can assemble the workflow you want. The first setup takes time, but every later content update, new job application, or site tweak gets fast enough to be addictive.
After These Units, What Should You Be Able to Do?
If you followed all four stages, you should now be able to:
- Open a project with Cursor or a similar AI IDE
- Understand the basic structure of a GitHub repo and Fork a copy to your account
- Run a project locally
- Build a personal knowledge map in Obsidian and let AI read local files to generate a personal site
- Solidify effective prompts into Skills and build reusable workflows
- Use CLI to pull jobs, customize resumes, deploy a site, and do proactive outreach
These are not advanced skills. They are baseline equipment for 2026.

After You Learn This, What Can You Do Next?
The fastest way to learn AI tools is not watching more tutorials. It is finding a real problem you already have and trying to solve it with AI. A work report, a personal project, or something you have wanted to start but never knew how. Any of those can be practice material.
Congdianzhan will keep running, with a different theme each time. If you want event updates first, follow us: